connectIPS has become one of the most popular e-payment systems in Nepal among bank users for fund transfers and payments of different bills/services easily using the mobile app or Internet banking. If you want to create a connectIPS account and link it to your bank account, here is a complete guide for you.
What is connectIPS?
connectIPS is an e-Payment system with different channels like mobile apps, the Internet, etc. which allows you to make your payment transactions directly from the bank account. This is available 24×7 and uses direct transactions from/to the bank accounts and is very instant for the sender and receiver. It is quite reliable as it works under the guidance of the Nepal Rastra Bank.

connectIPS allows you to link one or multiple bank accounts and then use one of such bank accounts for payments. This can be used for fund transfer and biller/service payments of e-commerce websites, travel & tour, school/college fee, airlines, insurance companies, utilities, etc.
Benefits of using connectIPS:
- Government Payments (Tax, Loksewa, Passport, etc.)
- Online Fund Transfer
- Credit Card Bill Payments
- Mobile Wallet Top-up
- 24×7 Availability
- Reliable and Instant
- Higher transaction limits up to Rs. 2,000,000
- Different Channels like Mobile App, Web Portal, Gateway
How it is different from mobile wallets like eSewa, Khalti, etc.?
connectIPS is different from mobile wallets like eSewa, Khalti, and others where you need to load/unload funds for payment transactions. While connectIPS processes payment transactions directly through a bank account linked with it. It can also be used to load/unload funds in these wallets.
It allows you to make individual payments of Rs. 1,000,000 through the web channel and Rs. 100,000 through the mobile app. Whereas the daily limit per bank is up to Rs. 2,000,000 through the web channel and Rs. 200,000 through the mobile app.
Moving on, here we have the steps to create connectIPS account and link to a bank account.
How to create connectIPS account and link to Bank Account?
You can create a connectIPS account and link it to your bank account easily from a web portal as well as Mobile App. connectIPS App is available for both android users and IOS users. Here, I have used the mobile app to create a connectIPS account. However, you can use a web portal as well from here.
Click Here to Visit connectIPS Web Portal.
The process for both mobile apps and web portals is quite similar. So, you can use any of them at your ease for this purpose. Here in this article, I have used a mobile app to create a connectIPS account and link it with my bank account.
Follow these steps to create a connectIPS account and link it to a bank account:
1. Download and Install Connect IPS App and Click on ‘Create New’.
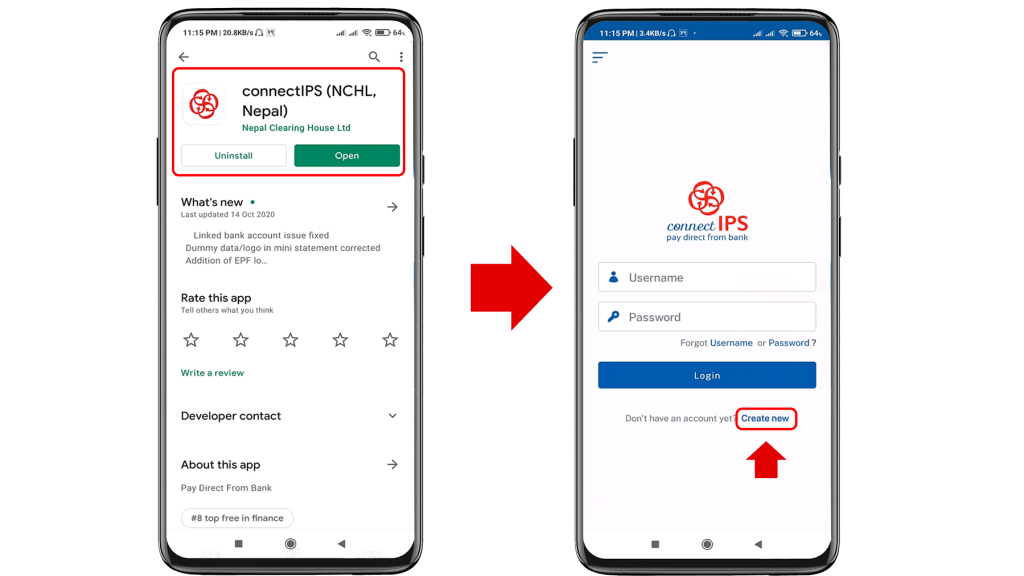
Click Here to Download connectIPS App
2. Enter the required information and set a username and password. Agree on terms and conditions to Get Started.
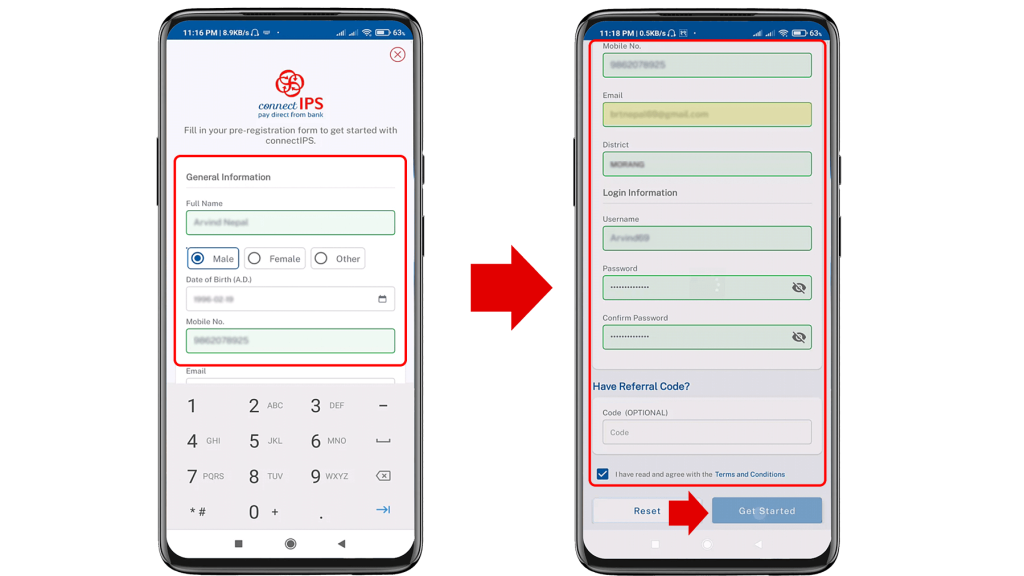
Information Required for creating connectIPS Account:
- Name
- Mobile Number
- District
- Custom Username & Password
- Referral Code (If available)
Note: Here I have skipped the referral code option as I am creating a connectIPS Account directly. You can enter a referral code if you have one from your friends or family.
3. Enter your username and password to log in to connectIPS.
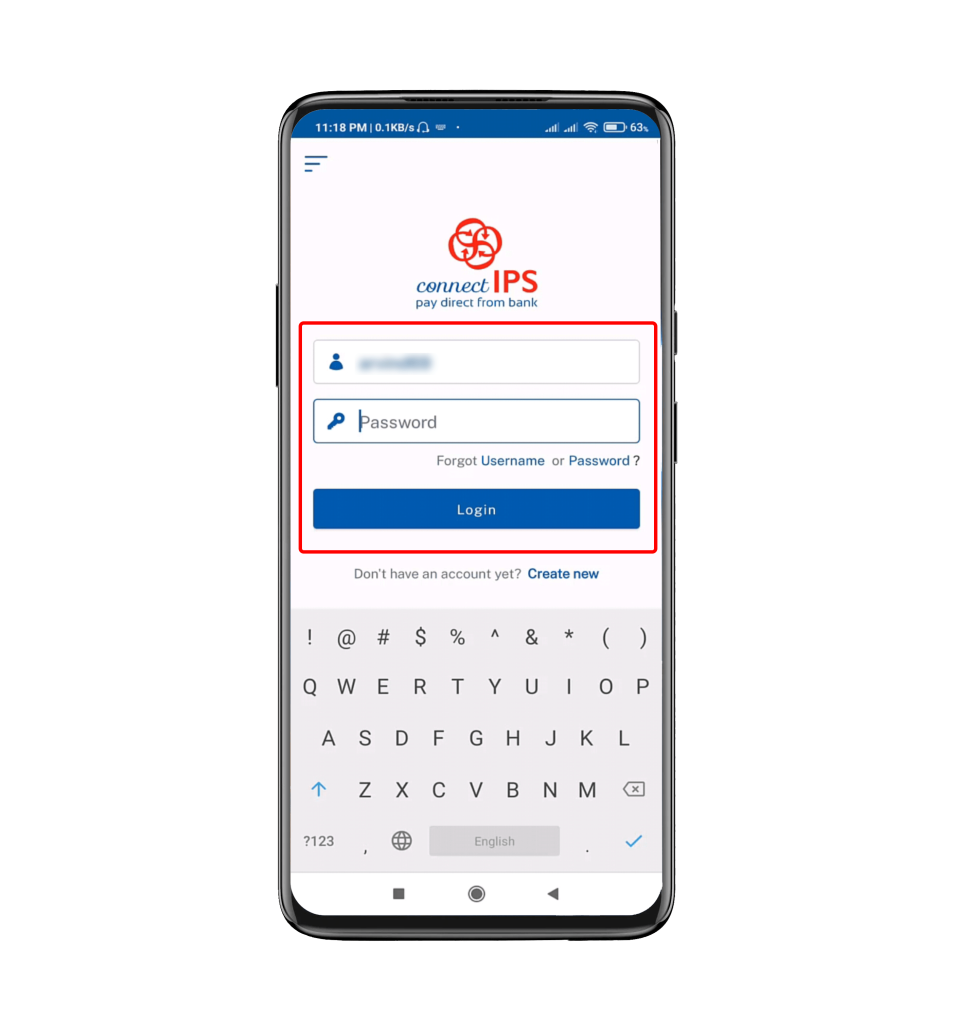
After you have logged in to your connectIPS app you have to complete 4 simple steps i.e., Security, Verification, Transaction and Linking your Bank. Follow the above steps to proceed.
4. Select the image and enter its name. Also, answer all Security Questions as per your choice to complete your security verification.
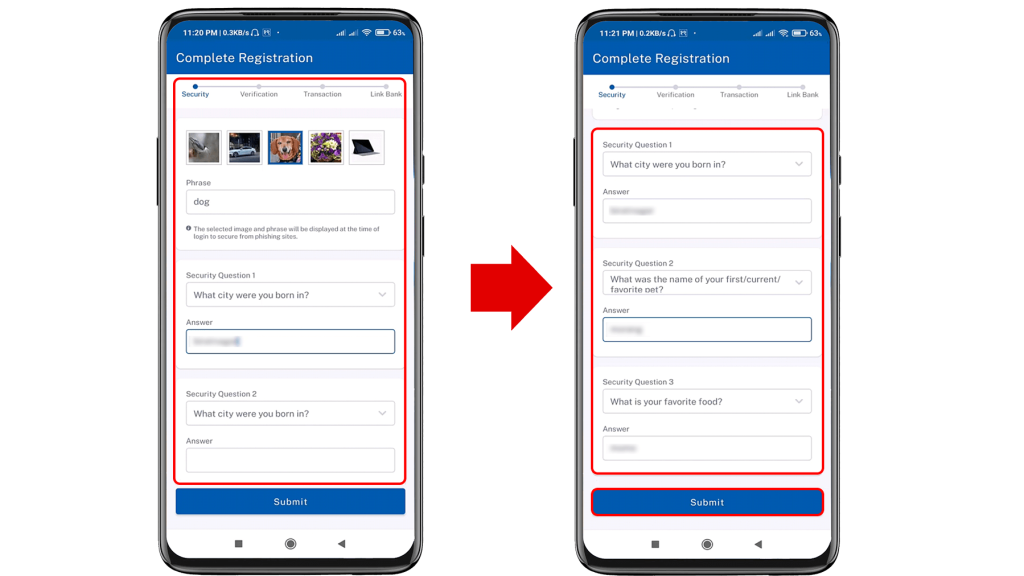
Note: Remember these 3 Security Questions and Answers at the time of enrolment and the same questions will be asked to re-verify you to allow the login password to reset.
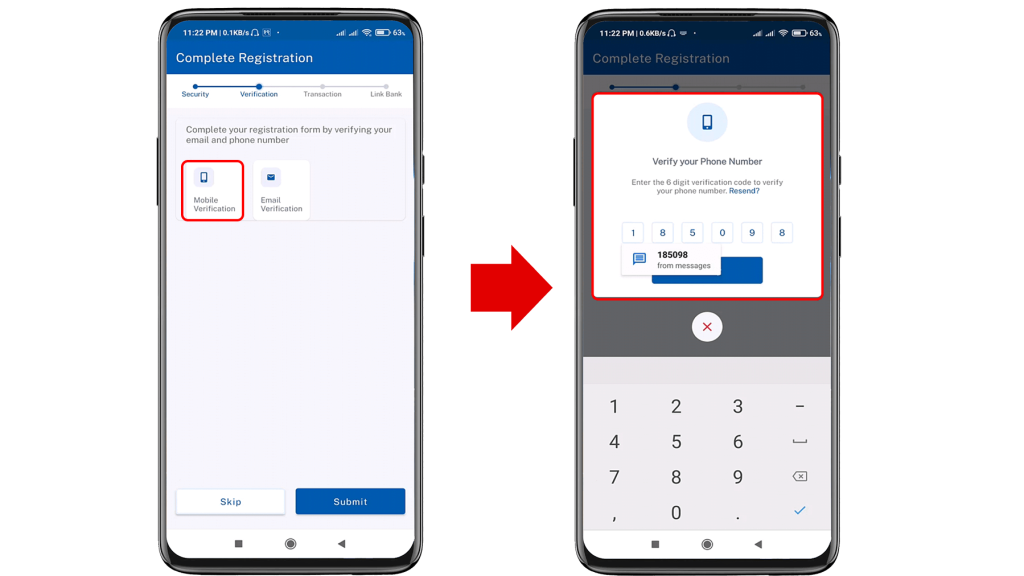
5. Click on Mobile Verification and enter the OTP code received on your mobile for verification.
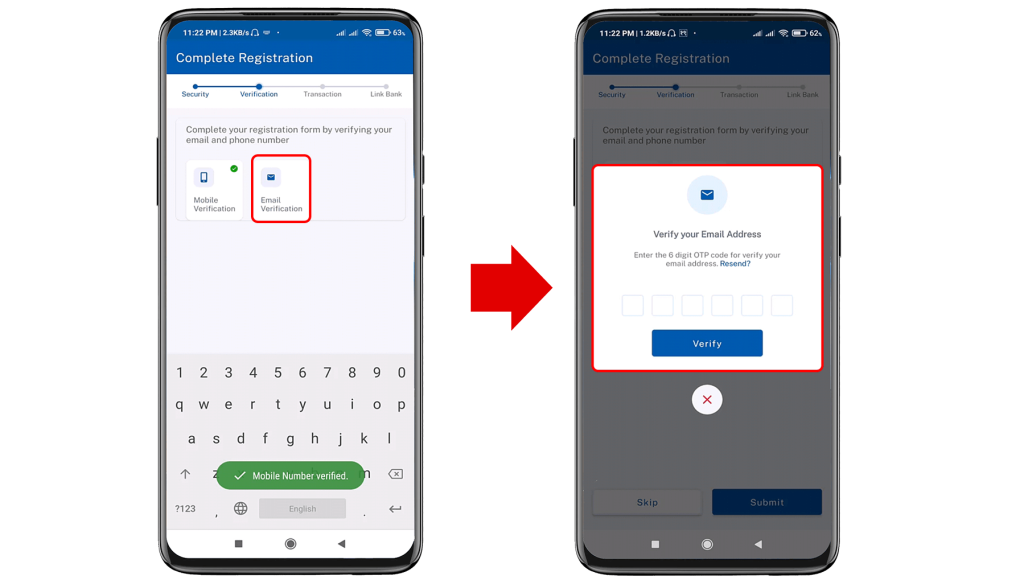
6. Click on Email Verification and enter the OTP code received in your email for verification.
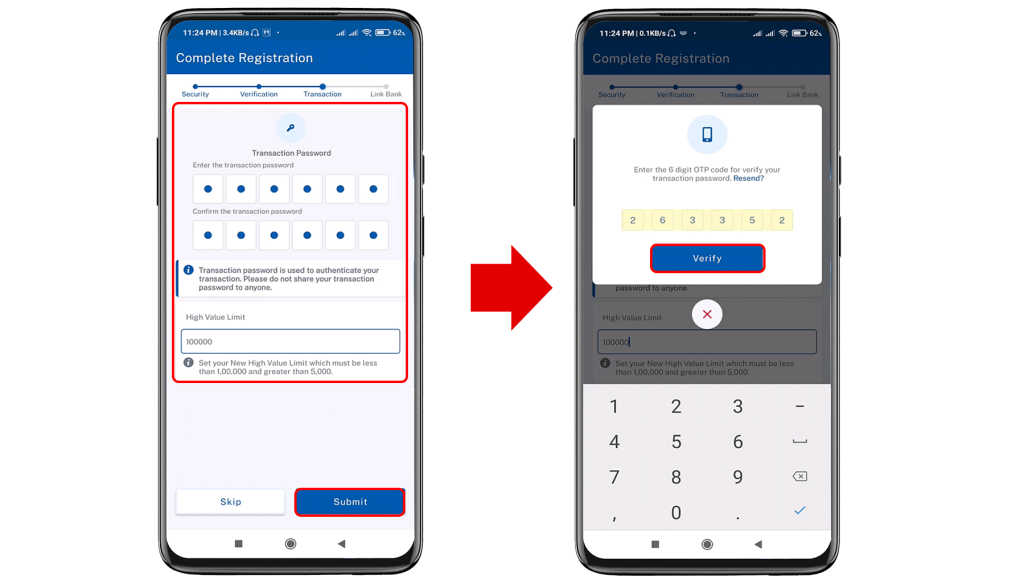
7. Create your Transaction Password and set the Transaction Limit by verifying OTP.
8. Enter the Account Information to link your bank account.
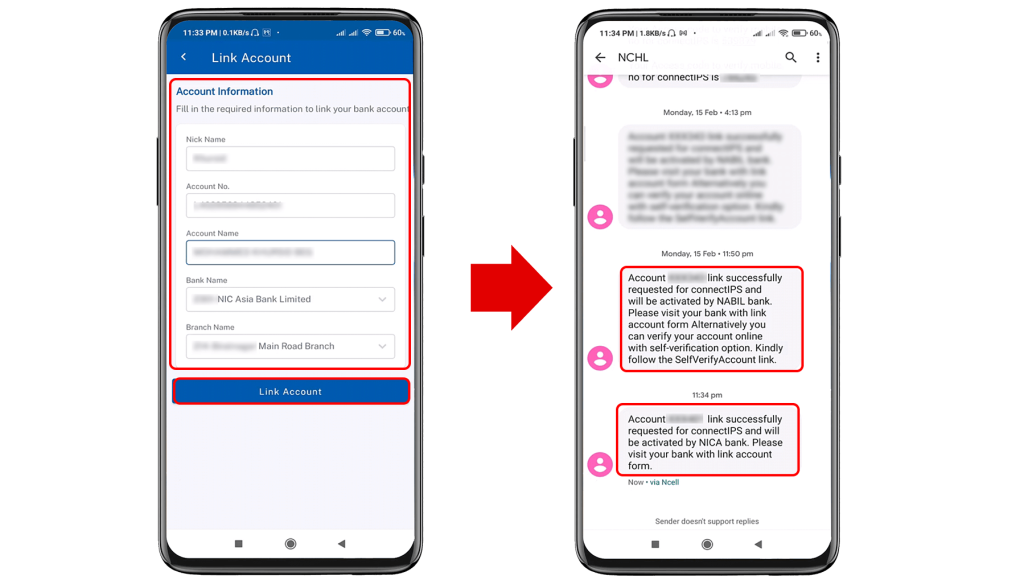
Information Required:
- Nick Name
- Account No.
- Account Name
- Bank Name
- Branch Name
Note: Different banks provide different options to link bank accounts with connectIPS. You will be notified of the further process through your email or SMS for the account verification and activation process.
In my case, the Nabil bank Account was verified through a self-verification link. While for NIC Aisa bank I was asked to go to the bank/branch counter for account verification and activation process. Whatever the case, you will be notified through SMS or Email from Connect IPS.
Click Here to see the list of banks with Self Verification Feature.
9. Verify your Account following the guidelines asked by connectIPS.
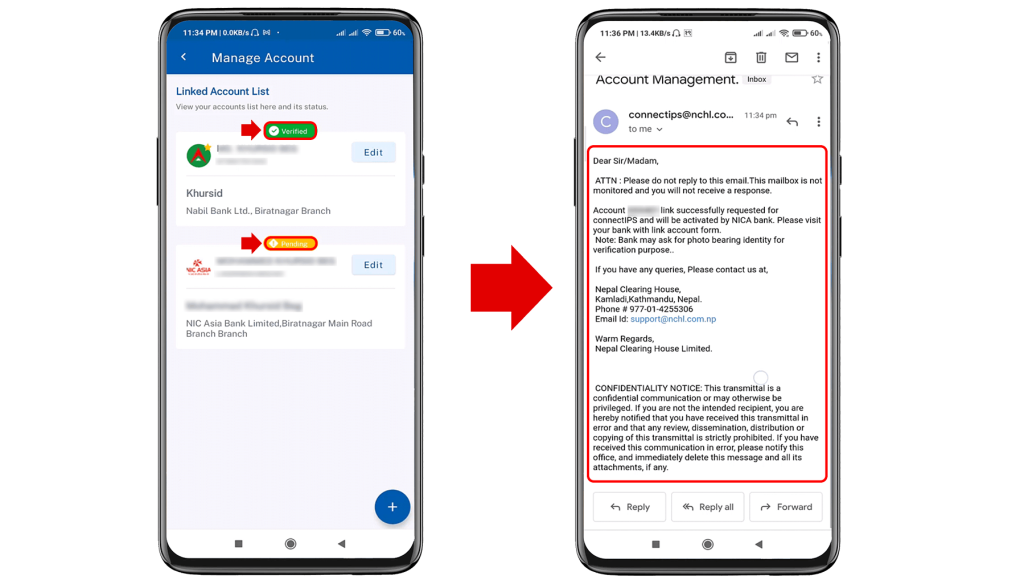
This is all about creating connectIPS account and linking it with a bank account. I hope this article has been helpful to you. Feel free to comment if you have any queries in the comment section. I will explain further details about connectIPS transaction process in my upcoming article. Stay tuned for that.
Subscribe to our newsletter for the latest tech news, tips & tricks, and tech reviews.
